Showing posts with label Bedrooms. Show all posts

Monday, August 27, 2012

Yes, Master! (Bedroom, that is!)

 
Here's the very first before picture of our master bedroom before we moved in! :) 


You can see the crazy changes this room has gone through here
 
 
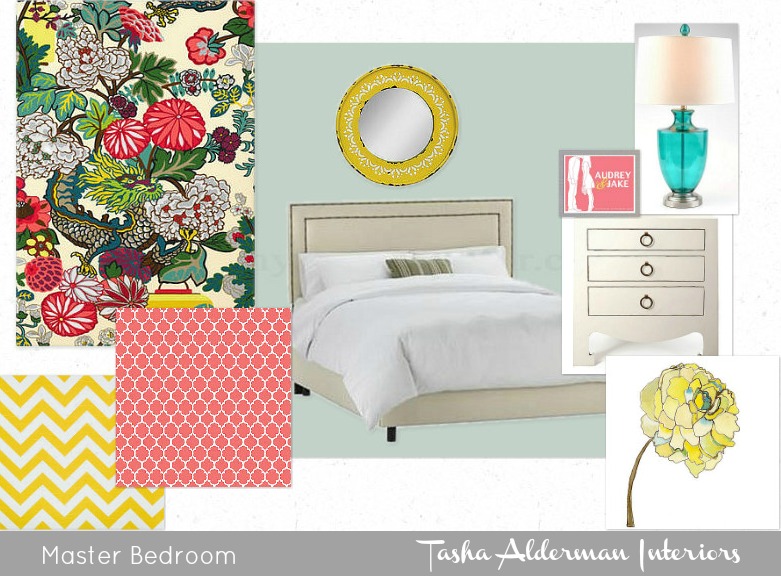
And here's the design board I put together for our new space!


We are slowly getting there, and I can't wait to share the 'before' and 'after, after, after' pics! ;)
 
What do you guys think?  Color overload or much improved? :)


Saturday, July 7, 2012

Let There Be Light!

Our master bedroom is officially about 50 times lighter than it was yesterday. (Thanks to my Dad, who painted all day!)  After much deliberation and three paint samples later, I finally decided on a fourth color! ;)  We went with Palladian Blue by Benjamin Moore, and we love it! :)


Here's a reminder of how our yummy dark chocolate bedroom looked before:


And here's our bright, happy room now!


I also decided to add a diaper station since we change approximately 139 diapers a day on our bed. ;)


We still plan to add crown molding, artwork, and more pillows.  Also, I'm most likely going to paint the mirror over our bed white.  But it'll look like this for at least another week or so because I'm switching to party planning mode now!  I have to get ready for Blake's 2nd birthday party this Saturday!  Anyway, we already love how much brighter it is in here, and I can't wait to add the finishing touches! :)


Saturday, June 30, 2012

The Master Bedroom Enlightenment


So, after meeting with our realtor, we came to the conclusion that it was not in our best interest to try and sell our home at this point in time.  We had mixed feelings about selling anyway, and we do love this house, so we'll be staying put for a while longer. :)  Our realtor did recommend that we repaint our master bedroom before we list our home, and even though that won't be anytime soon, we're going to go ahead and do it now so we can enjoy it until we move.  And, we're both kind of tired of our super dark bedroom and are ready for something lighter and brighter. :)  Here's our bedroom from the dark ages.  The paint color is Mink by Benjamin Moore.


And here's the inspiration picture for our fresh master bedroom makeover!  This gorgeous bedroom is from Studio Ten 25, and the paint color is Rainwashed by Sherwin Williams.


I bought a paint sample tonight, Sauna by Valspar.  I'll post pictures as soon as I've put it on the wall! :)  I'm crazy excited and can't wait to get started! 

Also, I mentioned our realtor, Dayla Brooks.  She's pretty much amazing!  If you or anyone you know needs a realtor, be sure to look her up! :)  http://www.hrmls.com/dayla 


Sunday, May 27, 2012

Beauty on a Budget


It's not always easy to decorate on a small budget, but it is possible!  Our budget for the entire guest bedroom/nursery makeover was $500, including furniture.  To accomplish this, I used six different tactics. 

1.  Start out by browsing designer rooms to get inspiration and ideas.  Familiarizing yourself with high-end looks will enable you to spot budget look-a-likes.
2.  Reuse as many items as possible from the previous room and the rest of the house. 
3.  Frequently scour thrift stores and consignment shops.
4.  Shop yard sales, Craigslist, Ebay, etc.
5.  Check out home decor discount stores such as T.J. Maxx, Marshalls, etc.
6.  Don't be afraid to use spray paint! ;)

Here's a breakdown of the budget for the guest bedroom side.  We already had the headboard, which was a DIY project from a few years ago, I just recovered it.  The chandelier and navy blanket were also items we already had.  The side tables were handed down from my mom and painted pink. :)


Mirror - Martha Stewart Home for Home Depot
Curtains - Target, 95" for $12.99 a panel
Fabric for headboard - Waverly curtain panel from Lowe's
Pink pillows - Ross
Trellis pillows - Target
Coverlet - T.J. Maxx
Lampshade - Lowe's
Lamp base - Goodwill (spray painted white)


And here's a before and after picture that shows the complete transformation:


All for under $200!  With a little creative thinking, a little DIY craftiness, and a lot of budget brainstorming, it is possible to design on a dime!  Or in our case, a penny! ;)


Tuesday, May 22, 2012

Before and After: Guest Bedroom Update

So, we are finally nearing completion on the guest bedroom!  There's only one small DIY project that I'm still considering! :)  And we're under budget, too!  Here are some before and after pictures of the various transitions the guest room has gone through.  The first picture is from the builder, so it's not our exact room.  The only difference is that we have a double window.  The after picture is how it looked after we first moved in and decorated.  The third picture is how the room stayed for about two years, and the last picture is how it looks now! :)


And stay tuned for the nursery reveal that will be coming soon! :)

Saturday, May 5, 2012

Sneak Peek

Ok, let me preface this post by saying that we are definitely not done yet!  We still have work to do, but we have made some progress, thank goodness!  We're down to two weeks until my due date, so we don't have much time left! :)  Here's a glimpse of the guest bedroom:


and here's the bookshelf on Cole's side:


Well, that's all for now, folks! ;)  Hopefully there will be more to come soon! :)

Tuesday, April 3, 2012

It's Easy as 1-2-3!

I know quite a few people who are terrified when it comes to decorating.  They view decorating a home as an extremely difficult, painful, and almost impossible task.  And while some people will never be as comfortable with decorating as others, I have good news!  If you can pick out an outfit, you can decorate a room! :)  And some of you are probably thinking, "Well, that's a problem...because I can't pick out an outfit either!"  Yes you can!  Don't be so hard on yourself! :)  It's easy peasy! ;)

Step One:  Think about the colors of your favorite outfit...I know we all have at least one!  For instance, one of my favorite spring outfits is navy, white, coral, and beige.

Step Two:  Identify patterns from your outfit to use as inspiration.  For example, stripes, polka dots, toile, damask, paisley, chevron, floral, etc.

Step Three:  Translate your favorite outfit into ideas for decorating a room. 

And here's a great example of how to turn a favorite outfit into inspiration for creating a gorgeous room!


Now go raid your closets and get inspired! :)